1. Standardized GitHub Nickname
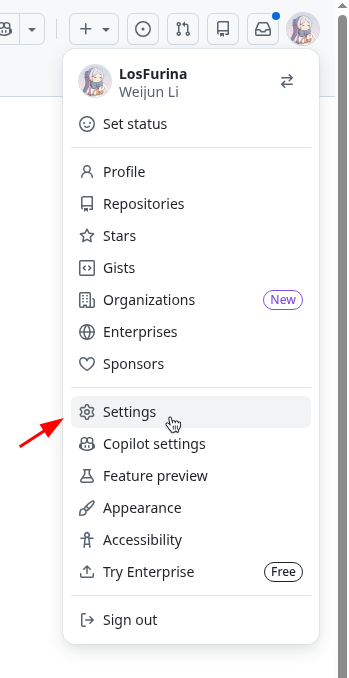
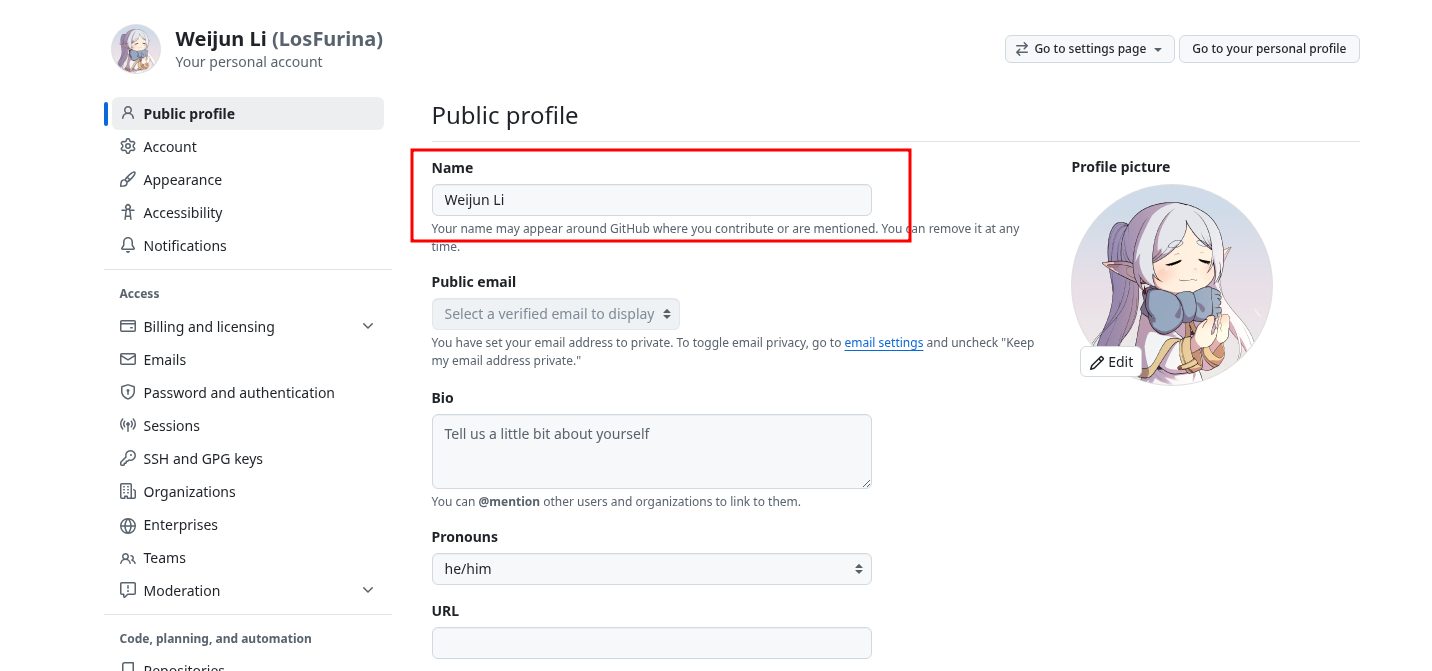
Everyone should change their GitHub nickname to their real name.
2. Role Distribution
2.1. PM
- Yanxia
2.2. Infra
- Weijun
- Zizhao
2.3. BE
- Yanxia
- Yuexing
- Chang
2.4. FE
- John
- Avi
- Pan
2.5. Survey
- Zhilu
- Zhonghui
- Diviya
If anyone is not satisfied with the role assignment, we can discuss it right now. Otherwise, we will follow the assignment above.
3. Git Collaboration Workflow
3.1. Branch Setup
Our projects — including Backend, Frontend, Infra, and github.io — each have two protected branches: main and dev.
Both branches are protected, which means no one can directly push code to main or dev. This is the most important rule for our development process.
Here is how it works:
-
Main branch can only be updated by Pull Request ( PR ) from dev, or hotfix.
-
Dev branch can only be updated by PR from a feature/fix branch.
-
Hotfixes must be pushed to both main and dev.
3.2. GitHub Project (Not Jira)
We decided to use GitHub Project as our project management dashboard.
- It is completely free — this is the main reason we chose it.
- It integrates easily with our code repositories via issue id.
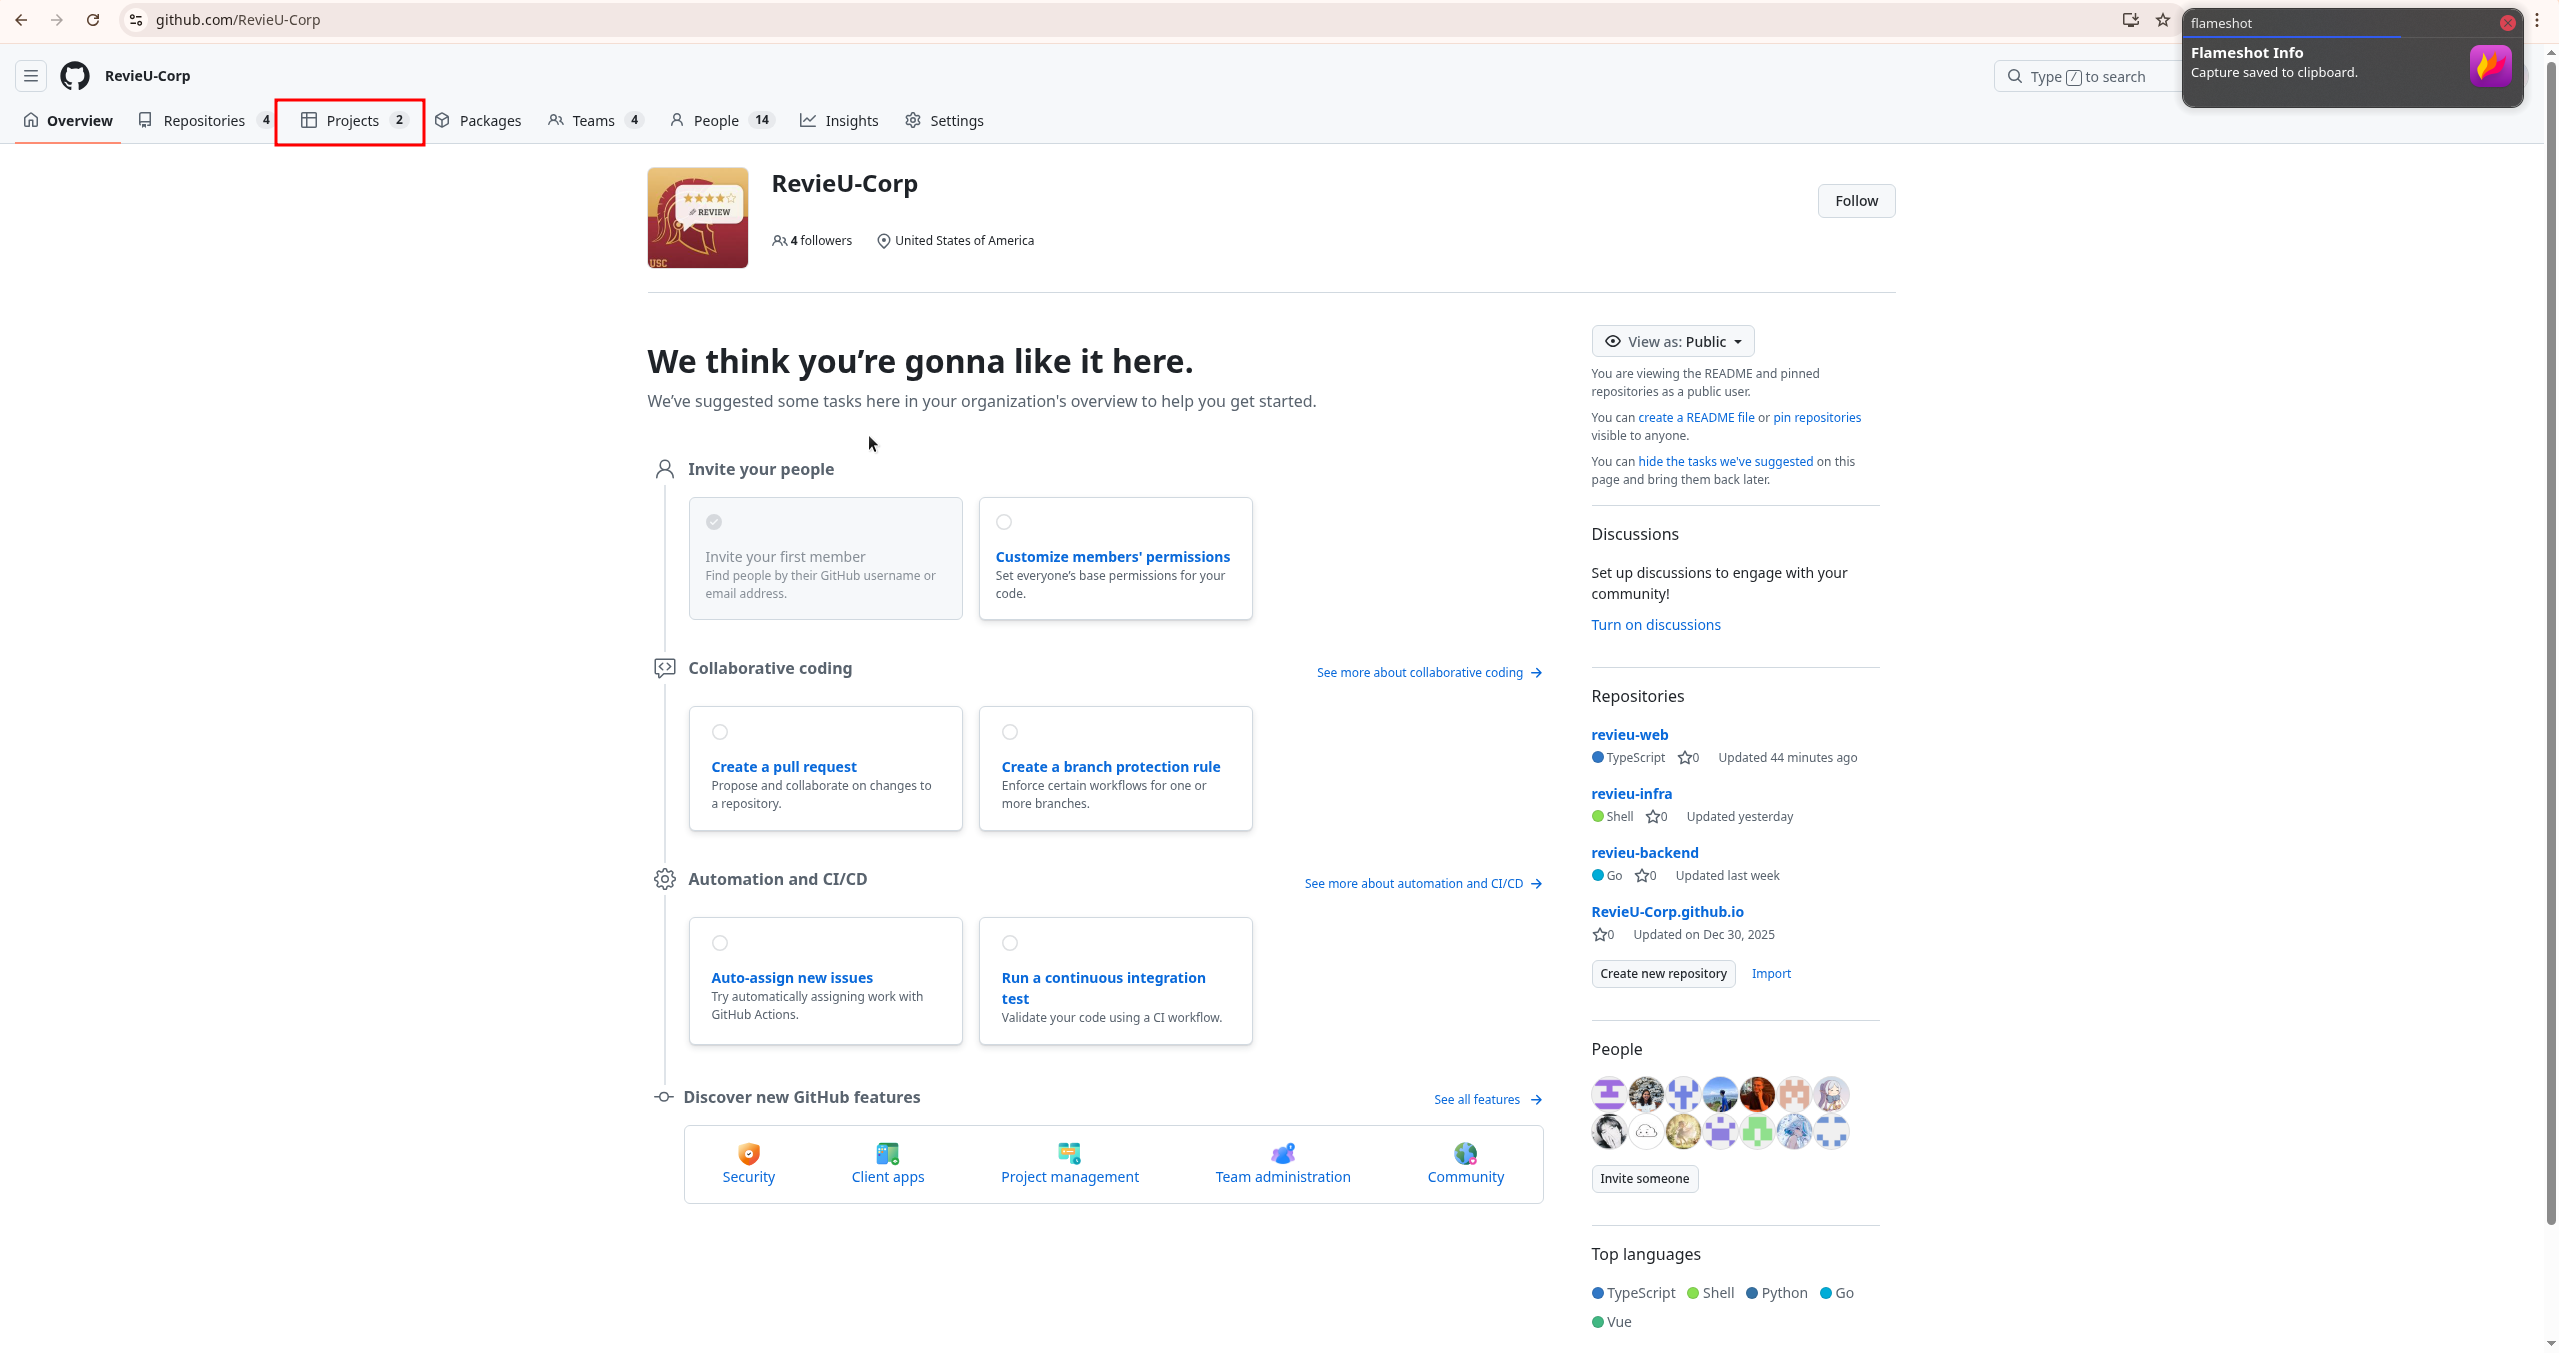
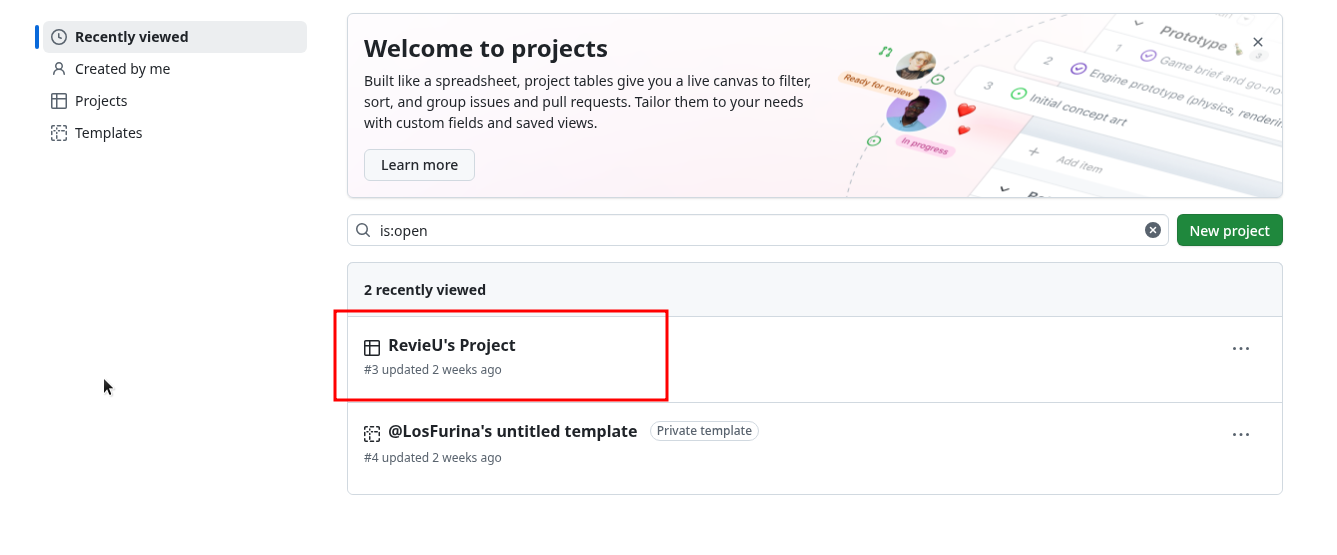
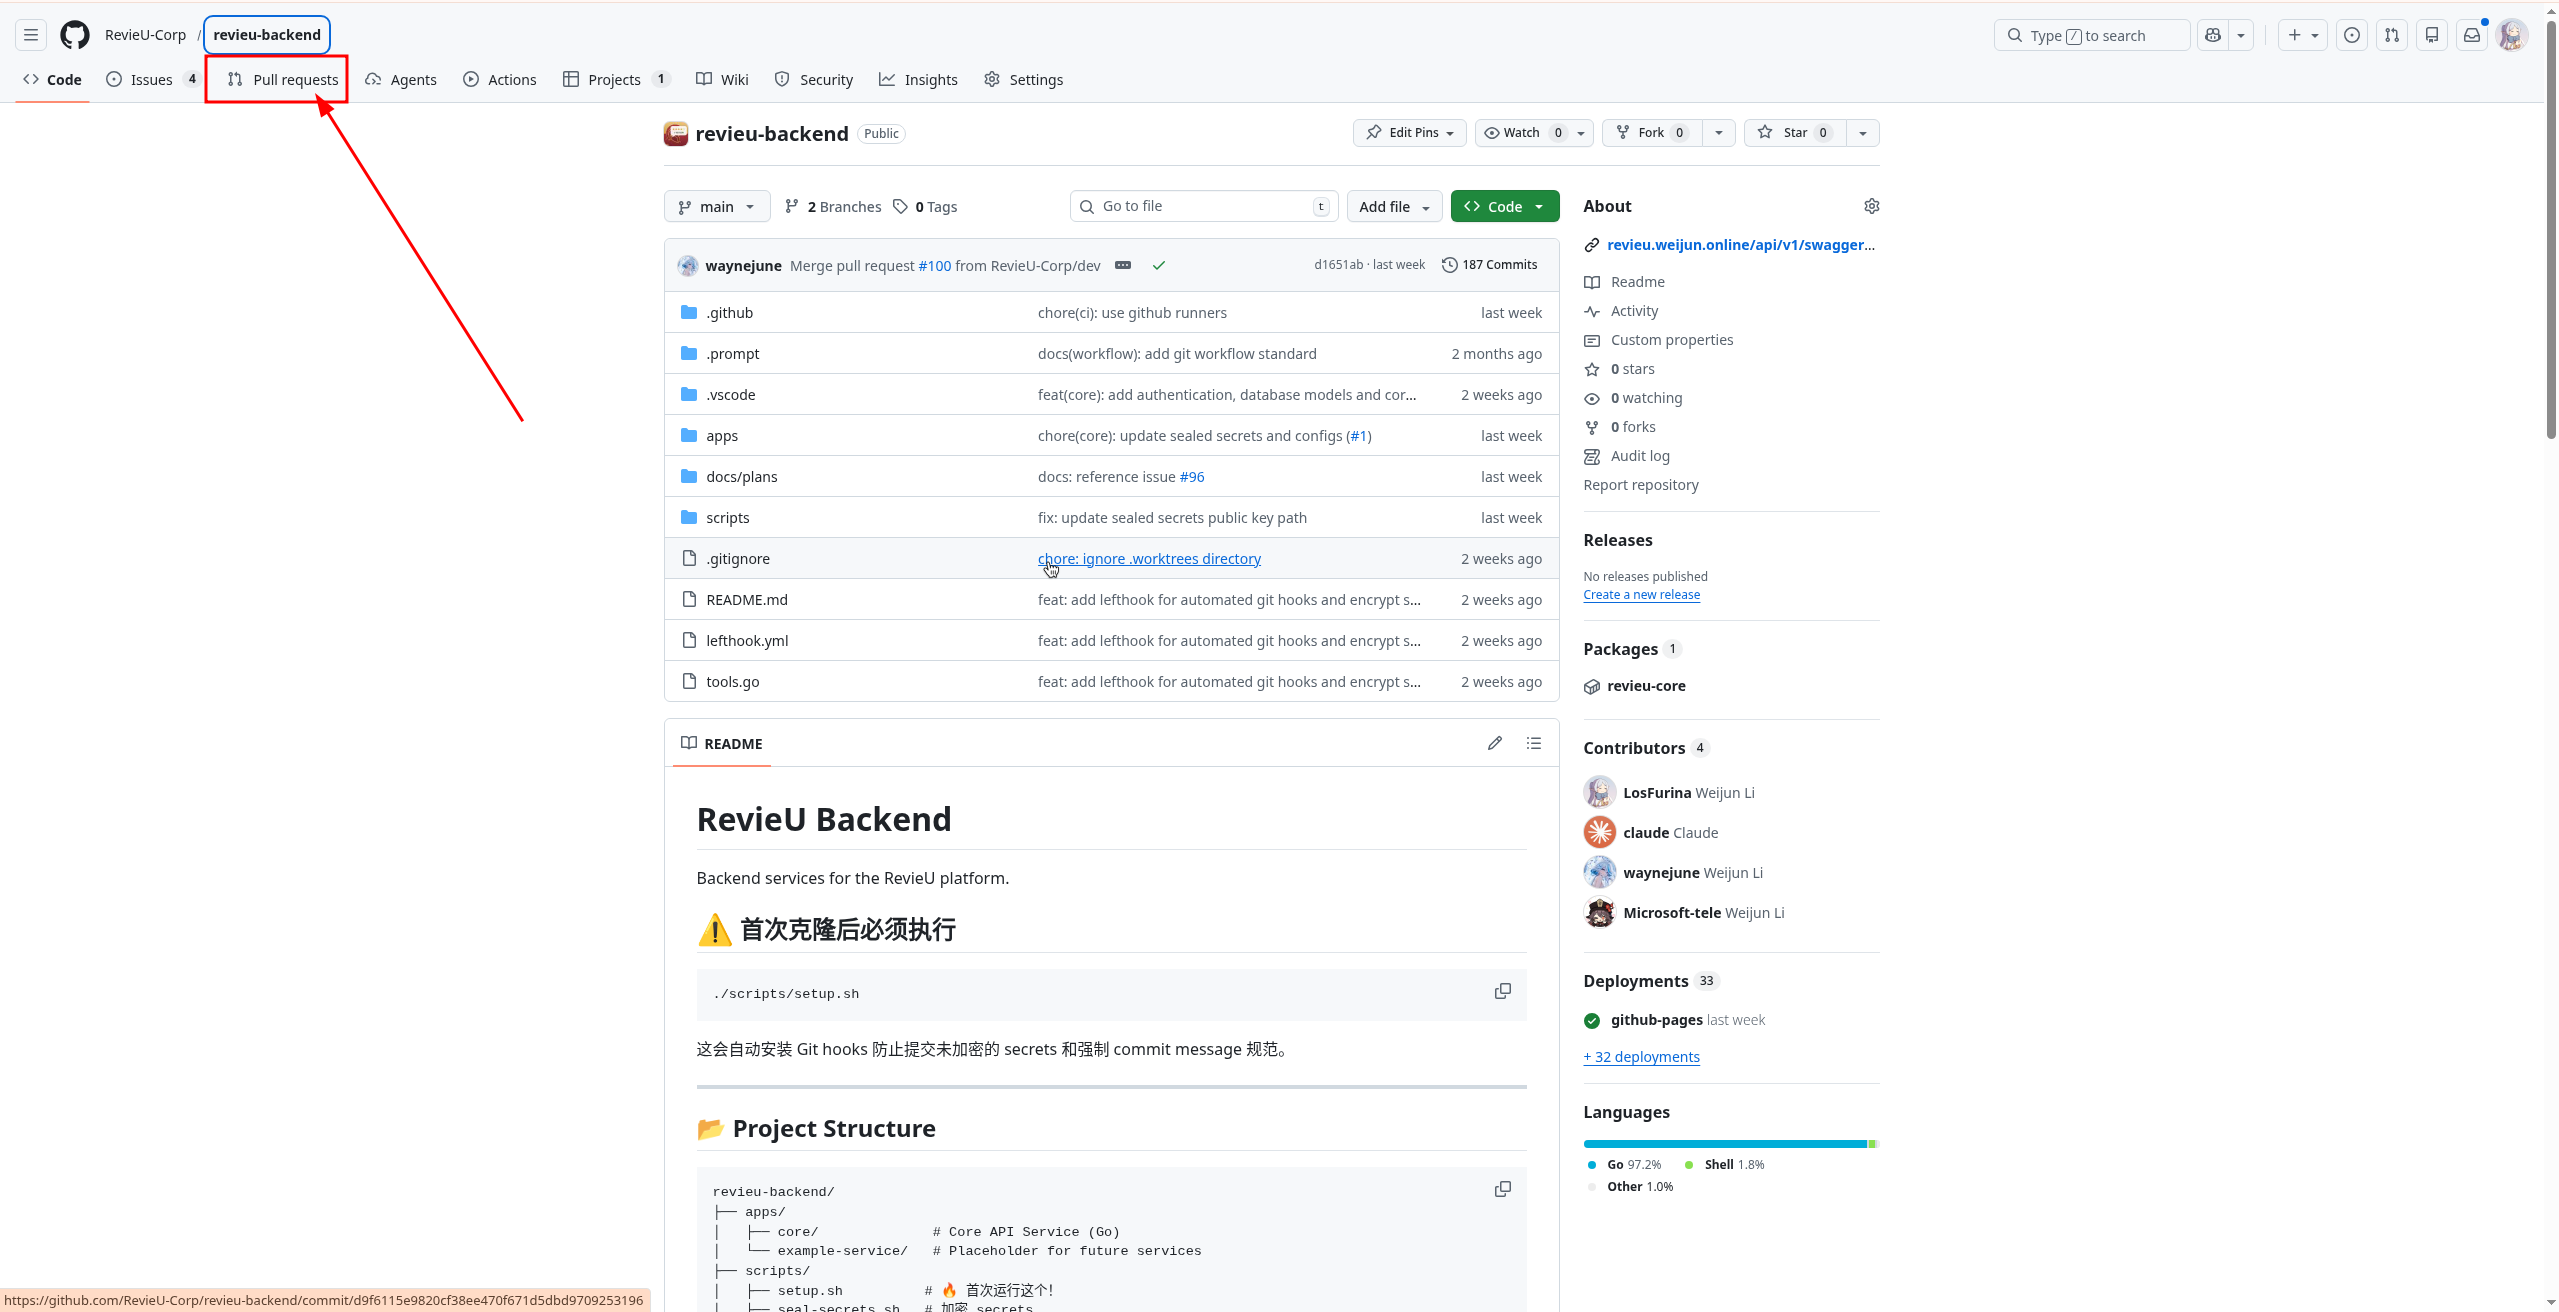
3.2.1. Where to Find GitHub Project
3.2.2. Basics of GitHub Project
- Every item in Backlog status item is still under discussion — it is not yet an actual task.
- When an item moves from backlog to ready, meaning the idea has been approved for implementation.
3.2.3. Who Can Create Backlog Items
- Anyone can create a Backlog item. If you have an idea, feel free to add it.
- However, most items are created by the PM and each team’s leader.
3.3. Complete Development Workflow
First of all, every item represents a complete task, so we need to follow the entire workflow for each item.
Step 1: Pick up a task from GitHub Project and assign it to yourself
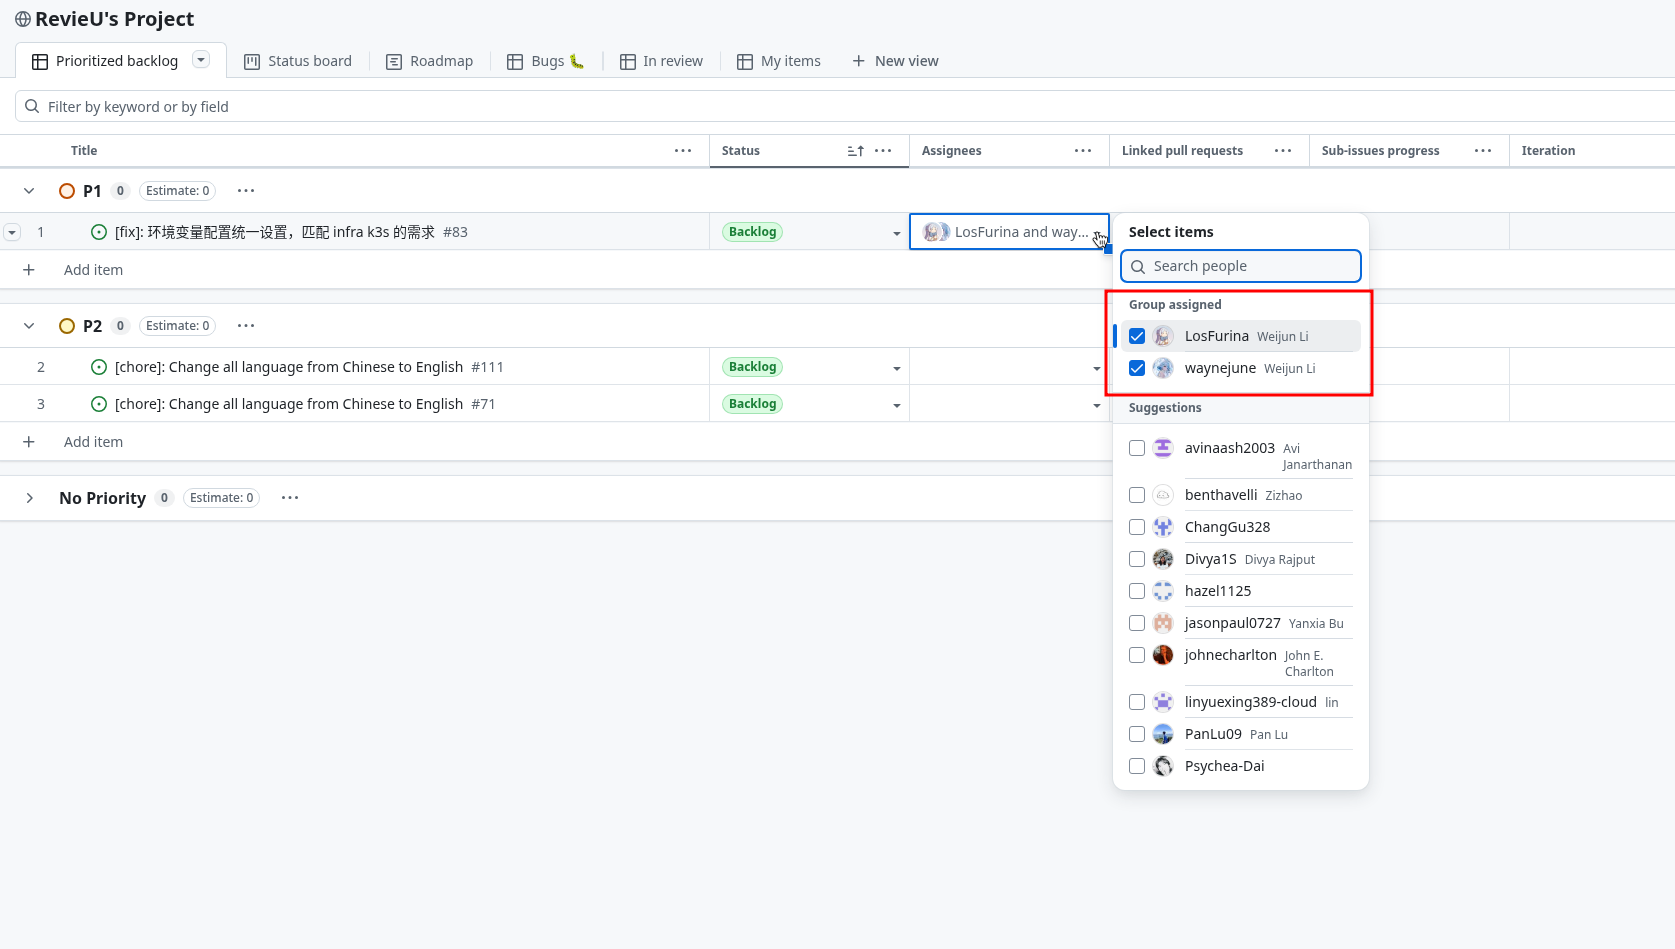
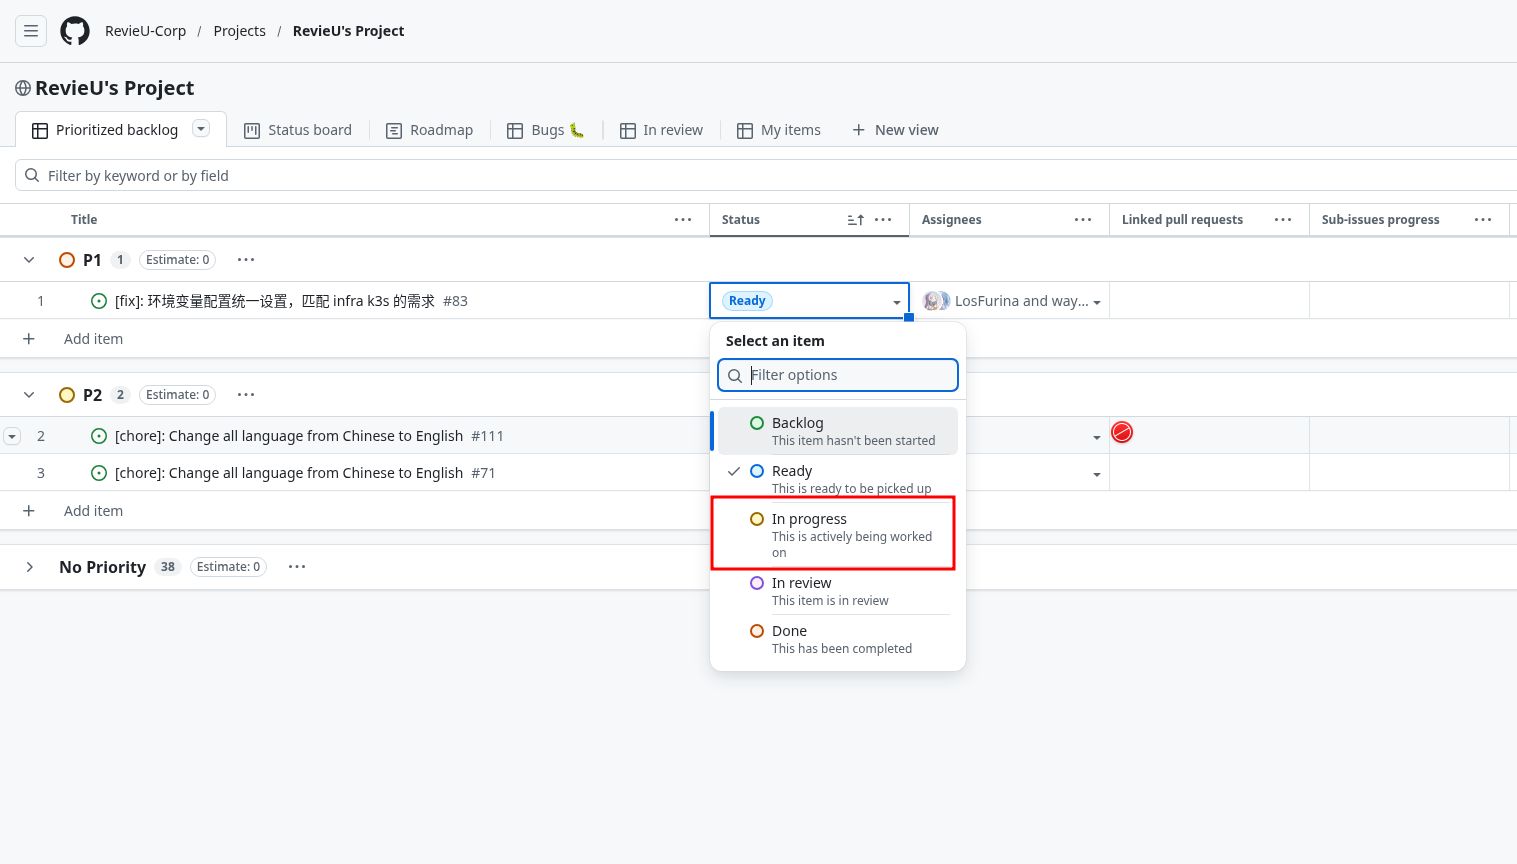
Step 2: Set status, change status from ready to In progress
NOTE: When you assign yourself to a job and change the status to in progress which means, no one except you can do this job! It’s very important to avoid some unexpected conflicts!!!
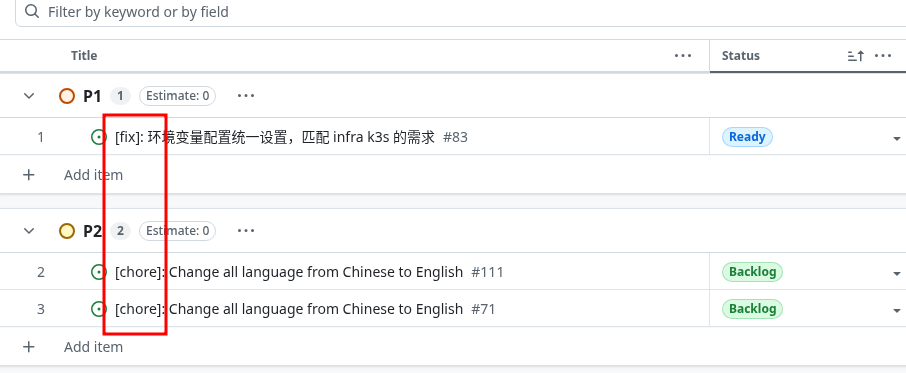
Step 3: Get the Issue ID and remember it
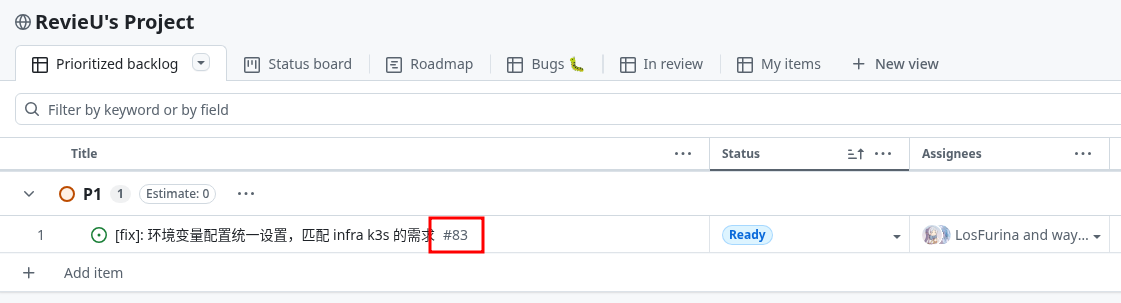
Now this task is yours — you can start developing.
Step 4: Sync your local environment with the remote — make sure your local main and dev branches are up to date
git checkout dev
git pull origin dev
git checkout main
git pull origin main
Step 5: Make sure you are on the dev branch
git status
git branch -a
You can check which branch you are on. If you are not on dev, run:
git checkout devStep 6: Create a new feat / perf / fix branch
The branch type is determined by the task type in GitHub Project.
git checkout -b fix/<issue-id>-<short-description>For example:
git checkout -b fix/83-standardized-frontend-configfileNow you can write your code.
Vitally important!: You shouldn’t modify the definition of DB model w/o discussion. You should create a backlog at GitHub Project and talk it with backend members.
Once you have finished development, follow the steps below.
Step 7: Add your changes
git add -AWarning: Not recommended — if you use this, you are responsible for any unintended changes, unless you know exactly what you are doing.
This command adds all changes at once.
You should know exactly which files you changed, and only add those files. For example:
You can use:
git statusto check your changes, and then:
git add src/apps/core/internal/domain/auth/router.goStep 8: Commit your changes
You can use:
git commit -m "type(<scope>: optional): Integrate .env and .vite.env into one file (#<issue-id>)" -m "First line of your commit body" -m "Second line of your commit body" (and so on) -m "Signed-off-by: github@liweijun.com" -m "Co-Auth: email" -m "Close #<issue-id>"For example:
Below is a commit message example with inline comments explaining the format:
feat(media): implement Cloudflare R2 presigned URL upload (#98)
# Note: must leave a <br> here
Add presigned URL media upload feature using Cloudflare R2 storage:
# Note: must leave a <br> here
- Add R2Config to config.go and config.yaml with env var expansion
- Create R2 client wrapper (pkg/storage/r2.go) using AWS SDK v2
- Extend MediaUpload model with UUID, UserID, ObjectKey, Status fields
- Add POST /api/v1/media/presigned-urls endpoint
- Support batch upload (up to 10 files)
- Validate content types (image/jpeg, image/png, image/gif, image/webp)
- Generate unique object keys: uploads/{year}/{month}/{uuid}.{ext}
- Update secrets.yaml.example with R2 environment variables
# Note: must leave a <br> here
Signed-off-by: Weijun Li <github@liweijun.com>
# Note: must leave a <br> here
Co-Authored-By: Claude Opus 4.6 <noreply@anthropic.com>
# Note: must leave a <br> here
Closes #98
And here is what the actual commit message looks like without comments:
feat(media): implement Cloudflare R2 presigned URL upload (#98)

Add presigned URL media upload feature using Cloudflare R2 storage:

- Add R2Config to config.go and config.yaml with env var expansion
- Create R2 client wrapper (pkg/storage/r2.go) using AWS SDK v2
- Extend MediaUpload model with UUID, UserID, ObjectKey, Status fields
- Add POST /api/v1/media/presigned-urls endpoint
- Support batch upload (up to 10 files)
- Validate content types (image/jpeg, image/png, image/gif, image/webp)
- Generate unique object keys: uploads/{year}/{month}/{uuid}.{ext}
- Update secrets.yaml.example with R2 environment variables

Signed-off-by: Weijun Li <github@liweijun.com>

Co-Authored-By: Claude Opus 4.6 <noreply@anthropic.com>

Closes #98
Please note: Any branch name or commit message that does not follow these rules will be rejected by the reviewer. All reviewers should strictly enforce this rule.
Step 9: Push your changes to the remote repository
git push origin fix/83-standardized-frontend-configfileNote: The branch name must match your current branch name.
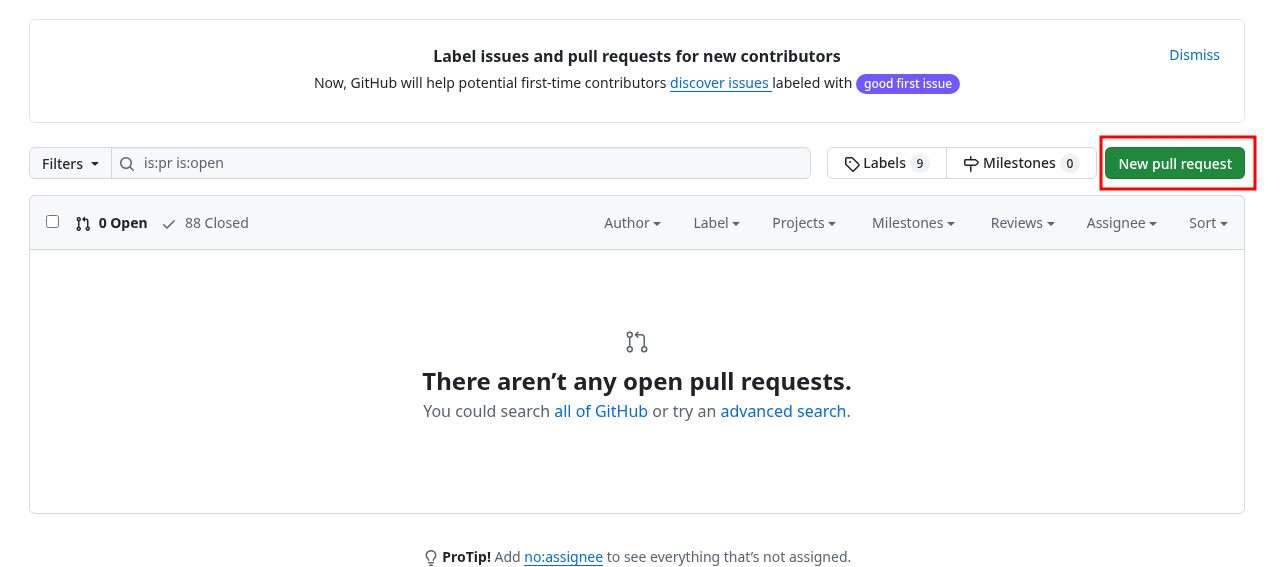
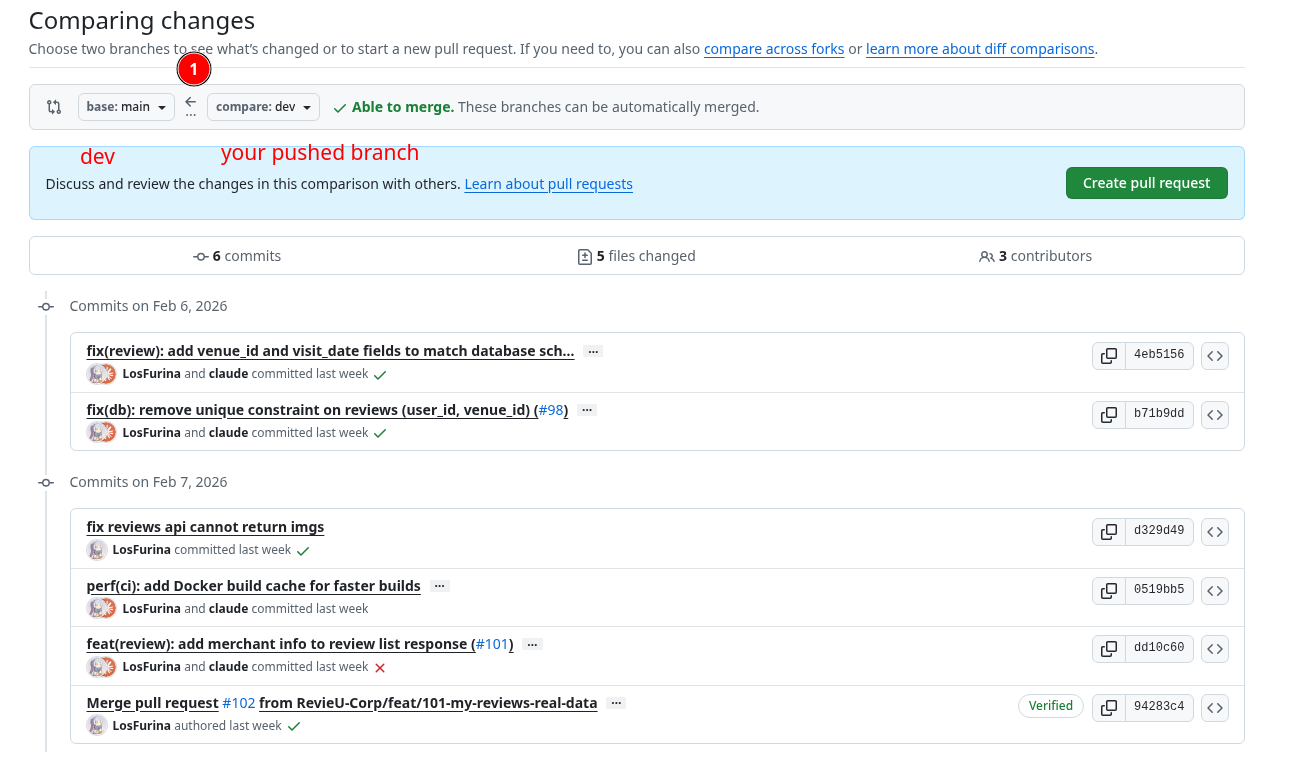
Step 10: Create a Pull Request (PR)
Conflict
If your PR cause conflicts, you should solve it.
Show when conflicts happen.
Who create conflict, who solve it!!!
Wait for Code Review and PR Approval
Once your PR is created:
- Request reviewers (usually team leads or senior developers)
- Address any feedback or requested changes
- Push additional commits to the same branch if changes are needed
- Wait for approval and merge
After PR is Merged: Clean Up Your Local Environment
Once your PR has been approved and merged into dev (or main for hotfixes), you need to clean up your local environment to complete the development cycle.
Step 1: Switch back to dev branch
git checkout devStep 2: Pull the latest changes from remote
git fetch --prune
git pull origin dev
This ensures your local dev branch is now synchronized with the remote repository, including your merged changes.
Step 3: Delete your local feature branch
git branch -d fix/83-standardized-frontend-configfileThe -d flag safely deletes the branch only if it has been fully merged. If you need to force delete (rare cases), use -D instead.
Step 4: Delete the remote feature branch (optional but recommended)
git push origin --delete fix/83-standardized-frontend-configfileThis keeps the remote repository clean. Alternatively, you can delete it via GitHub’s PR interface after merging.
Step 5: Sync your main branch (if dev was merged to main)
If the dev branch was later merged into main, remember to sync your local main as well:
git checkout main
git pull origin main- Pick up task → 2. Create feature branch → 3. Develop → 4. Commit → 5. Push → 6. Create PR → 7. Review → 8. Merge → 9. Clean up local environment → 10. Sync branches → 11. Mark task as done
4. I Need Your SSH Public Key (Not GPG Key)
If you plan to join the development work — especially BE team members — I will grant you access to the PostgreSQL database.
Send to my email github@liweijun.com with subject:
<Your name>'s <SSH Public Key>
like:
Weijun Li's SSH Public Key

Body:
ssh-ed25519 AAAAC3NzaC1lZDI1NTE5AAAAIPaxmUU4JKm7Atu22cHGHZjvZ8qgVGcF2GnXB2/FqeQe wayne-5090

Note: Only Pub Key, no private Key
4.1. If You Don’t Have a Key Yet
ssh-keygenAfter running this command, you can find your public key at ~/.ssh/id_ed25519.pub.
Please use ed25519, not RSA.
5. Strongly Recommended (Not Required): Sign Your Commits with GPG
Signing your commits is strongly recommended, but not required. If you don’t have this set up yet, you can still contribute.
Why we recommend it:
- Identity verification: teammates (and CI) can cryptographically verify the commit was made by you.
- Tamper-evidence: if a commit is modified after signing, the signature becomes invalid.
- GitHub “Verified” badge: signed commits can show as Verified on GitHub once your public key is added.
5.1. Generate a GPG Key
First, make sure you have gpg installed:
gpg --versionGenerate a key (interactive):
gpg --full-generate-keyList your secret keys and copy the key id (the long hex string after sec):
gpg --list-secret-keys --keyid-format=long5.2. Add the Public Key to GitHub
Export your public key:
gpg --armor --export <YOUR_KEY_ID>Then go to GitHub: Settings -> SSH and GPG keys -> New GPG key, and paste the exported output.
Note: to get the GitHub Verified badge, your GPG key email should match git config user.email, and that email should be verified on GitHub.
5.3. Configure Git to Sign Commits
Set the signing key:
git config --global user.signingkey <YOUR_KEY_ID>Enable signing by default:
git config --global commit.gpgsign true(Optional) Also sign tags:
git config --global tag.gpgsign trueTest it:
git commit --allow-empty -m "chore: test signed commit"
git log --show-signature -1